
Modernisation is an on going process and as a database expert you might be part of discussion involving modernisation of databases .
Oracle offers lot of ways to modernise your databases and one of them is to move to Exadata Database Service on Dedicated Infrastructure in OCI.
Definitely there are lot of things to consider for database migration and one of them will be to choose right method or tools for migration.
One of the factor that can influence your decision in choosing the migration tool will be the ability meet existing RTO/RPO requirement during and after migration.
This can become complex if you have an existing Physical Standby database to meet RTO/RPO requirement . Most likely you need a Physical Standby database on the Target Platform immediately after the migration to maintain the RTO/RPO.
Is there any method or tool which can help you in this ?
.
Yes , it is possible when you use Oracle Zero Downtime Migration(ZDM) with Cloud Native Disaster Recovery workflow.
Let’s dive in.
Below is my environment.
Source Primary Database: src_dbcsp ( Oracle Base Database in Frankfurt )
Source Standby Database : src_g4s_fra ( Oracle Base Database in Frankfurt)
Source DB Version : 19.26
Target Primary Database : src_exap (Oracle ExaDB-D in Frankfurt VM cluster 2)
Target Standby Database : src_exas (Oracle ExaDB-D in Frankfurt VM Cluster 3)
Target DB version : 19.26
ExaDB-D stands for Exadata Database Service on Dedicated Infrastructure.
Below is the high level steps that ZDM will perform for this workflow.
- ZDM starts database migration
- ZDM starts a restore from service operation
- ZDM instantiates a standby database on the target primary
- ZDM synchronizes primary and standby on the target primary
- ZDM starts a restore from service operation
- ZDM instantiates a standby database on the target standby
- ZDM synchronizes source and target standbys
- ZDM monitors switchover readiness
- ZDM performs switchover and swaps roles
- ZDM configures the target primary and restores the cloud broker configuration
a. ZDM restores cloud broker configuration between cloud target primary and cloud target standby
b. ZDM configures the target primary to ship redo logs to the target standby - ZDM performs post-validations
- ZDM finalizes the migration process
Let’s explore how we can achieve this.
I have divided the steps in to multiple sections as below so that it is easy to navigate.
Step 0 – Prerequisites
Step 1 – Prepare ZDM Service Host
Step 2 – Establish network connectivity
Step 3 – Prepare Source Database
Step 4 – Prepare Target Database
Step 5 – Prepare response file
Step 6 – Database Migration.
Let’s explore one step at a time.
Step 0 – Prerequisites
I have created Source Databases (Primary and one physical standby) in Oracle Base Database in OCI for this article . You don’t need this step for an actual scenario since you have a source database that you want to migrate.
Please create a Target Primary Database in ExaDB-D and use console to create a Physical standby database in ExaDB-D (recommended).
Please note that these target databases are brand new and doesn’t have any data. As part of migration these databases will be recreated as standby databases and later during role reversion one of them will become Primary and another one will be physical standby.
Step 1 – Prepare ZDM Service Host
Spin up an OCI compute host with Oracle Linux 8 (you can also choose RHEL 8) and follow the instructions to set up a ZDM service host. You can also set up ZDM in a compute in your on-premises.
Please ensure to download the latest ZDM software from Oracle Support Portal using Patch ID : 33509650 (Latest one at the time of writing this article is 21.5.1.0.0).
I have provisioned ZDM service host in the same VCN as the Source and Target so that it is easy to handle the connectivity.
Step 2 – Establish network connectivity
This is a very crucial step.
I have deployed Source databases (Primary and Standby) , Target Databases (In ExaDB-D VM Clusters) and ZDM Host in to the same VCN to make the connectivity easier.
However for an actual use case , your source database might be an on-premise database , in that case you either need VPN or Fast Connect to OCI so that you can reach ExaDB-D database.
Please note that for this article, source and target hostnames were easily resolvable from ZDM service host since it is using DNS in OCI. For actual use case , you should ensure that source and target hostnames are resolvable from ZDM host or alternatively you can use their IP address.
Also SCAN names for source database was easily resolvable from target and vice versa since both are in same VCN . For the actual use case you will have to add the SCAN name for source database to target host (/etc/hosts) and vice versa.
I have made necessary changes to allow the below required communication.
| Initiator | Target | Protocol | Port | Purpose | Notes |
| ZDM host | Source DB host (Primary) | TCP | 22 | SSH | |
| ZDM Host | Target ExaDB-D (Primary) | TCP | 22 | SSH | |
| ZDM host | Target ExaDB-D (Standby) | TCP | 22 | SSH | |
| Source Primary DB | Target ExaDB-D (Primary) | TCP | 1521 | SQL*Net | |
| Source Primary DB | Target ExaDB-D – Standby | TCP | 1521 | SQL*Net | This is required if you are planning to ship redo logs from Source Primary to Target Standby. I haven’t used this feature in this article. |
| Target DB – Primary | Source DB (Primary) | TCP | 1521 | SQL*Net | If you need FALLBACK option and also in case you are using Broker enabled switchover. |
For detailed information on the network connectivity , refer to ZDM documentation.
Step 3 – Prepare Source Database
There are couple of steps that you need to perform on the source database to ensure it is ready for migration.
Most of these requirements are related to Physical Database Migration involving Data Guard.
Please refer to ZDM documentation for detailed instructions.
Step 4 – Prepare Target Database
We also have to take care of few changes in target database for this migration . Please refer to ZDM documentation for detailed instructions.
Please note the below important points.
Target database should have same database character set and national character set as the source database.
Target database should have same DB_NAME and different DB_UNIQUE_NAME (Data Guard requirement) compared to source database.
You should properly size your target database.
Step 5 – Prepare response file
Oracle ZDM requires a response file for migration where you can specify the details of the migration.
I have prepared a response file like below and saved it in ZDM host.
TGT_DB_UNIQUE_NAME=<db_unique_name_of_target_primary>
MIGRATION_METHOD=ONLINE_PHYSICAL
DATA_TRANSFER_MEDIUM=DIRECT
PLATFORM_TYPE=EXACS
TGT_STBY_NODE=<host_name_of_exadb-d_standby_node>
TGT_STBY_DB_UNIQUE_NAME=<db_unique_name_of_target_standby>
TGT_STBY_AUTH=zdmauth
TGT_STBY_SUDO_USER=opc
TGT_STBY_IDENTITY_FILE=<path_to_private_key_used_to_access_exa_stby_node>
TGT_STBY_SUDO_PATH=/bin/sudo
NONCDBTOPDB_CONVERSION=FALSE (This is the default value , however I had to mention it explicitly otherwise ZDM_SWITCHOVER_SRC phase was failing)
Most of the parameters are self explanatory , Please refer ZDM documentation if you need help.
Step 6 – Database Migration
Okay , let’s proceed with database migration.
Let’s do a migration evaluation (or dry run).
I have started the migration evaluation using below command.
$ZDM_HOME/bin/zdmcli migrate database -sourcedb src_dbcsp -sourcenode dbcsp -srcauth zdmauth -srcarg1 user:opc -srcarg2 identity_file:/home/zdm2151/mykey.key -srcarg3 sudo_location:/bin/sudo -targetnode fraexaclu2-2uyfk1 -rsp /home/zdm2151/physical_online_dr.rsp -tgtauth zdmauth -tgtarg1 user:opc -tgtarg2 identity_file:/home/zdm2151/myexa.key -tgtarg3 sudo_location:/usr/bin/sudo -eval
You have to provide Source Database SYS password when asked.
Below are some quick details about the options used in above command.
-sourcedb – specify db_unique_name of source database.
-sourcenode – specify hostname of source database.
-srcauth – specify authentication plug-in ( I have used zdmauth in this case).
-srcarg1 user:<username> – specify the user having sudo privileges on the source database server ( I have used opc here).
-srcarg2 identitity_file:<file_name> – specify the private ssh key file for user mentioned with -srcarg1.
-srcarg3 – location of sudo command.
-rsp – specify the response file with absolute path.
-tgtauth – specify authentication plug-in ( I have used zdmauth in this case).
-tgtarg1 user:<username> – specify the user having sudo privileges on the target database server (This is always opc in this case).
-tgtarg2 identity_file:<file_name> – specify the private ssh key file for user mentioned with -tgtarg1.
-tgtarg3 sudo_location – location of sudo command.
-eval – specifies to run the migration as an evalution (or Dryrun)
Below is sample output of the evaluation command.

We can monitor the progress of evaluation using below command
$ZDM_HOME/bin/zdmcli query job -jobid 3
3 is the job_id for the evaluation that I have initiated.
Below is sample output.
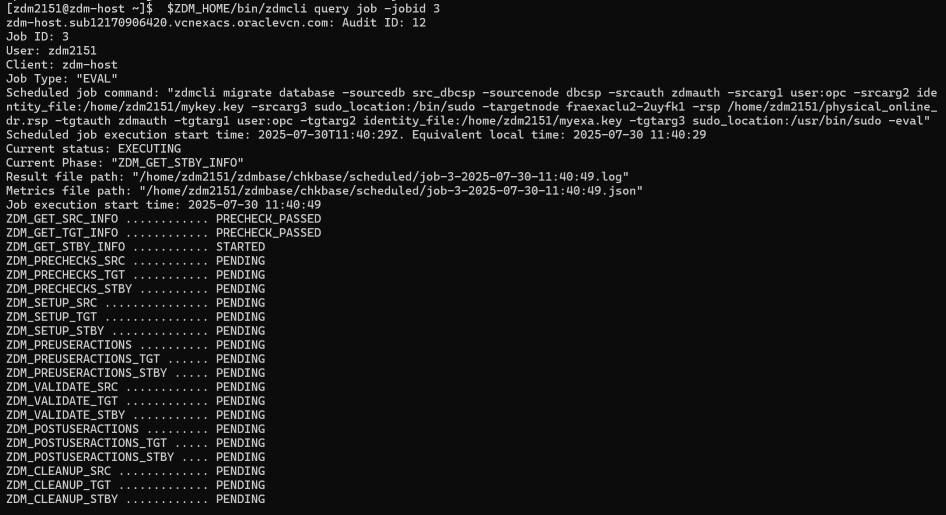
If you see any other status other than PRECHECK_PASSED , you have to rectify the issue and you can refer the logfile mentioned in the above output (Result file path) to understand more about the issue.
At the end of successful migration evaluation , you will see that all phases got completed with PRECHECK_PASSED status.

Great! , We are good with dry run.
Let’s initiate the database migration.
We can use the same command we used for evaluation(with out -eval) and with some pauses after certain phase.
I would recommend having a pause after ZDM_CONFIGURE_DG_TGT phase. Please note that all the phases from the beginning until this phase can be done while your Source Database is available for Business.
Below is the command I have used .
$ZDM_HOME/bin/zdmcli migrate database -sourcedb src_dbcsp -sourcenode dbcsp -srcauth zdmauth -srcarg1 user:opc -srcarg2 identity_file:/home/zdm2151/mykey.key -srcarg3 sudo_location:/bin/sudo -targetnode fraexaclu2-2uyfk1 -rsp /home/zdm2151/physical_online_dr.rsp -tgtauth zdmauth -tgtarg1 user:opc -tgtarg2 identity_file:/home/zdm2151/myexa.key -tgtarg3 sudo_location:/usr/bin/sudo -pauseafter ZDM_CONFIGURE_DG_TGT
You can keep monitoring the migration using below command.
$ZDM_HOME/bin/zdmcli query job -jobid 4
4 is my job_id for migration.
ZDM will pause the migration when it has completed ZDM_CONFIGURE_DG_TGT phase and at this stage ZDM has configured your Target databases(Primary and standby) as standby databases and will retain the state until you ask to resume further.
You can continue like this until the downtime window , typically it should be scheduled with in next days or couple of weeks.
Once you are in the approved downtime window , you can come back to ZDM and issue below command to resume the migration.
$ZDM_HOME/bin/zdmcli resume job -jobid 4
In this case 4 is the job_id for my migration.
ZDM will proceed further and perform Data Guard role reversal and other steps and at the end of migration you will have your Target Primary with Primary database role and Target Standby in physical standby role (receiving redo from Target Primary). Since we have not specified to skip the fallback(SKIP_FALLBACK=FALSE) in response file , you will see that Source Primary(now it is a physical standby) can receive the redo from Target Primary.
You can also perform additional pauses if required.
At the end of successful migration , you will get a screen similar to below.

Happy Migration!
Leave a Reply